How to Make Afghan Naan Bread | Naan Barbari Recipe
Description :
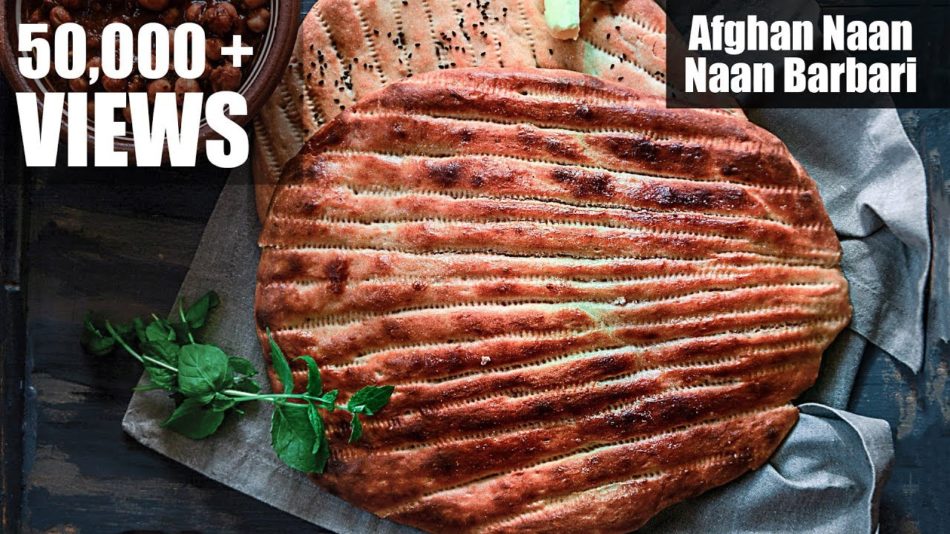
Afghan naan breads are soft and fluffy, long and oval shaped flat-breads. They are traditionally made in wood-fired ovens but they also taste awesome when they are baked in the electric oven. The most distinguishing element of this bread is the addition of the nigella seeds. And the addition of butter makes them rich and delicious.
Print full recipe here: https://www.mygingergarlickitchen.com/afghan-naan-bread-video/
———————–
INGREDIENTS:
———————–
Bread flour + 1 tbsp – 3 cups
Salt – 1 tsp
Quick rising yeast – 1 packet
Sugar – 1 tsp
Oil – 2 tbsp
Warm water – 1 cup
Warm water for needing dough
Nigella seeds (optional)
Butter for brushing naan (optional)
…………………
Instructions:
…………………
1. Mix 1 cup of warm water, yeast, and sugar and let it sit for 10 minutes or until it is foamy.
2. Combine flour, salt, and oil to large a mixing bowl. Mix well.
3. Pour the yeast mixture into a bowl and begin mixing using a wooden spatula.
4. When the dough is about to come together, use your hands to knead well for 5 minutes.
5. Cover the bowl with a towel or plastic wrap and let it sit in a warm place 1-2 hours. Punch down the dough.
6. Preheat the oven to 200°c/400°F.
7. Divide dough into 2 equal parts.
8. Combine 1 tbsp flour + 5 tbsp water and mix well to make a liquid lump free mixture.
9. Apply some flour mixture to your hands flatten a ball into an oval.
10. The oval should be about 10-12 inches long and about ¼-inch thick.
11. Draw tines with an opener or fork to make the desired pattern.
12. Sprinkle nigella seeds, and bake for 8-10 minutes or until brown.
13. At this stage naan is ready, but I like to broil it for 2 minutes. (I have made both broiled and non-broiled versions of this bread. And I love them both.)
14. Apply butter and wrap them in a tea towel or cloth to keep them warm and soft.
15. Enjoy with your favorite curry.
If you loved this easy recipe video, then please do give it a like and also share this video with your family and friends. Also, please subscribe to my channel. Feel free to ask if you have any queries regarding this recipe. I would love to help you.
Also, do hit the bell icon. If you hit the bell icon, you will be the first one to receive the notification about all my new video uploads. Happy cooking. Thanks for watching. ?
SUBSCRIBE HERE ➔ https://www.youtube.com/channel/UCRyPPlAalIpnYtj8ONdN_4w
FOLLOW ME:
WEBSITE: http://www.mygingergarlickitchen.com/
BLOG: http://www.mygingergarlickitchen.com/
FACEBOOK: https://www.facebook.com/MyGingerGarl…
PINTEREST: http://www.pinterest.com/anupamapaliw…
TWITTER: https://twitter.com/anupama_dreams
GOOGLE+: https://google.com/+MyGingerGarlicKit…
INSTAGRAM: https://www.instagram.com/mygingergarlickitchen/
SOUNDTRACK: OctoBlues Kevin MacLeod (incompetech.com)
▶︎▶︎▶︎▶︎ Kitchen Gadgets I use and recommend ◀︎◀︎◀︎◀︎
Pressure Cooker – https://amzn.to/2IbDGSG
Waffle maker- https://amzn.to/2Zb9g8q
Hand Mixer – https://amzn.to/2D97xH6
Gas Stove – https://amzn.to/2IbOeRy
Mixer Grinder – https://amzn.to/2P0o1pL
Oven Toaster Grill – https://amzn.to/2IbFzyy
Microwave Oven – https://amzn.to/2P1Hy9a
Grill Sandwich Toaster – https://amzn.to/2YZwAWu
Frying Pan – https://amzn.to/2D8QogL
Food Processor – https://amzn.to/2Z1X4Xy
Stand Mixer – https://amzn.to/2uXgL4M
Juicer – https://amzn.to/2YZkrRm
Garlic Presser – https://amzn.to/2uU2Axr
Immersion Blender – https://amzn.to/2D5BZlm
▶︎▶︎▶︎▶︎ Camera gear I use ◀︎◀︎◀︎◀︎
Camera Body 1 – https://amzn.to/2uZ90Ly
Camera Body 2 – https://amzn.to/2Z5C4yO
Lens 1 – https://amzn.to/2X2HTvj
Lens 2 – https://amzn.to/2uX5uBv
Lens 3 – https://amzn.to/2uZ9Fg0
Lens 4 – https://amzn.to/2D5AHa0
Tripod 1 – https://amzn.to/2uXLZcc
Tripod 2 – https://amzn.to/2WXsmwP
Reflector – https://amzn.to/2v1SUkl
▶︎▶︎▶︎▶︎ Check Out These Helpful Videos ◀︎◀︎◀︎◀︎
https://www.youtube.com/watch?v=uXPFHD87W7g&t=5s
| Date Published | 2016-03-25 13:50:19Z |
| Likes | 394 |
| Views | 61696 |
| Duration | 0:09:42 |

